Translate

Tuesday, December 9, 2014

Redirect tomcat console log output to a file

1>Set the environment variable CATALINA_HOME to point to whereever your tomcat is installed. For me that was C:\Program Files\apache-tomcat-7.0.55


2>Save the script below as a *.ps1

clear-host

$catalinaBat = $env:CATALINA_HOME+"\bin\catalina.bat"

$logOutputPath="$env:CATALINA_HOME"+"\logs\"

$logOutputFile= "catalina.out"


set-location "$logOutputPath"

Start-Process -FilePath "$catalinaBat" -ArgumentList "run > $logOutputFile  2>&1"

write-host "Your tomcat log is being written out to "$logOutputPath$logOutputFile


This script will run launch tomcat and write the output to a file.

Sunday, November 30, 2014

C# Return data from a thread

The easiest way to get a return value from a thread in C# is to start it as a Task.

public static void Main(String[] args)
   {
       Task<int> task = Task.Run(() => Add(1, 2));
       int result = task.Result;
   }
 
   public static int Add(int a, int b)
   {
       return a + b;
   }

You can also add multiple lines of code to the task

Task<int> task = Task.Run(() =>
    {
        Console.WriteLine("Adding..");
        return Add(1, 2);
    });

Note here that int result = task.Result; blocks the main thread until the result is obtained.


Catching Exceptions in tasks


     try
     {
         Task<int> task = Task.Run(() => Add(1, 2));
 
         task.Wait();
     }
     catch (AggregateException ex)
     {
         Console.WriteLine(ex.InnerException.Message);
     }

Asynchronously running a thread

You don't have to wait for the result. You can kick off the process to fetch the result and then continue doing something else. You can then run some other code when the result is finally available.


using System;
using System.Runtime.CompilerServices;
using System.Threading;
using System.Threading.Tasks;
 
internal class Test
{
    public static void Main(String[] args)
    {
        Task<int> task = Task.Run(() => Add(1, 2));
        TaskAwaiter<int> awaiter = task.GetAwaiter();
        awaiter.OnCompleted(() =>
        {
            Console.WriteLine("The result is {0}", awaiter.GetResult());
 
        });
 
        Console.WriteLine("past awaiter");
        Thread.Sleep(20000);   
        Console.WriteLine("The end");
    }
 
    public static int Add(int a, int b)
    {
        for (int i = 0; i < int.MaxValue; i++)
        {
            int x = 10;
        }
        return a + b;
    }
}


Sunday, November 9, 2014

Logstash config for IIS logs

Taking help from this article, I came up with a logstash.conf file that works both for IIS and apache tomcat at the same time.


input {

    file {    
         
 path => ["C:/inetpub/logs/LogFiles/W3SVC1/*.log"]
  type => ["iislog"]
    }

file {    
         
         path => ["C:/Program Files/apache-tomcat-7.0.55/logs/*.txt"]
    type => ["tomcatTxtLog"]
    }

}


filter {
  if [type] == "iislog" {
 
         #ignore log comments
         if [message] =~ "^#"
{
            drop {}
         }
grok {
             
 match => ["message", "%{TIMESTAMP_ISO8601:log_timestamp} %{WORD:iisSite} %{IPORHOST:site} %{NOTSPACE:Sip} %{NOTSPACE:verb} %{URIPATH:request} %{NOTSPACE:QueryString} %{NUMBER:port} %{NOTSPACE:Hyphen1} %{NOTSPACE:Cip} %{NOTSPACE:httpversion} %{NOTSPACE:UserAgent} %{NOTSPACE:Hyphen2} %{NOTSPACE:Hyphen3} %{NOTSPACE:referer} %{NUMBER:response} %{NUMBER:subresponse} %{NUMBER:scstatus} %{NUMBER:bytes:int} %{NUMBER:timetaken:int}"]
            }
date
{
            match => [ "log_timestamp", "YYYY-MM-dd HH:mm:ss" ]
       timezone => "Etc/GMT"
         }
mutate {
            remove_field => [ "Hyphen1","Hyphen2","Hyphen3","Sip","Cip","log_timestamp"]
         }
     }
  else if [type] == "tomcatTxtLog" {
  #ignore log comments
  if [message] =~ "^#"
{
            drop {}
         }
         grok {
           match => ["message", "%{COMMONAPACHELOG}"]
           }
  date
  {    
            match => [ "timestamp", "dd/MMM/yyyy:HH:mm:ss Z" ]
            timezone => "Etc/GMT"
           }
   mutate {
            remove_field => [ "timestamp"]
         }
 
     }
}

output{
   elasticsearch {
     cluster=>"VivekLocalMachine"
      port => "9200"
      protocol => "http"
    }
}


Wednesday, November 5, 2014

Viewing tomcat logs with Logstash in a Windows 7 machine (Logstash beginner level tutorial/walkthrough)

If you want to monitor logs from multiple sources, for example tomcat, IIS and so on from a single location, logstash is your friend. The way logstash works is that it takes log data from multiple sources and formats all of them into the same format and pushes that data for storage into elastic search. You then use Kibana to monitor that data.


In this article we will just look at a very basic example to help you get started. Do these steps to follow along

Prerquisites

  • You need jdk (I have jdk1.7.0_67)
  • You need to have apache tomcat installed

Steps

Install logstash


Unzip that file and copy it into C:\Program Files


Install and start up Elastic search


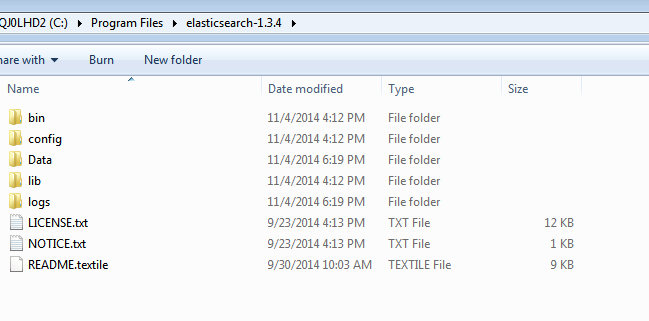
Unzip it and copy it into C:\Program Files\elasticsearch-1.3.4


Open C:\Program Files\elasticsearch-1.3.4\config\elasticsearch.yml in notepad
Change clustername to whatever you like. I set mine to VivekLocalMachine


################################### Cluster ###################################

# Cluster name identifies your cluster for auto-discovery. If you're running
# multiple clusters on the same network, make sure you're using unique names.
#
cluster.name: VivekLocalMachine

Double click C:\Program Files\elasticsearch-1.3.4\bin\elasticsearch.bat to start up elastic search service.


Install Kibana and point it to the elastic search service


Copy Kibana to your tomcat webapps folder, for me that was C:\Program Files\apache-tomcat-7.0.55\webapps

Overwrite
C:\Program Files\apache-tomcat-7.0.55\webapps\kibana-3.1.1\app\dashboards\default.json
with the contents of
C:\Program Files\apache-tomcat-7.0.55\webapps\kibana-3.1.1\app\dashboards\logstash.json

Open C:\Program Files\apache-tomcat-7.0.55\webapps\kibana-3.1.1\config.js  in notepad.
Check the value of elasticsearch. That is where Kibana would be looking for elastic search database.

Open kibana web ui in browser. You can open it directly from tomcat manager. For me that url was
http://localhost:8080/kibana-3.1.1/#/dashboard/file/default.json


If you are hosting Kibana in IIS instead of tomcat, you need to add json mime type to IIS.

Set logstash configuration to read tomcat log and pump that data into elastic search


First we need to create a *.conf file (you can give it any name). This file is what will tell logstash where to read the data from and where to send that data to.  I am going to create a file called logstash.conf in C:\Program Files\logstash-1.4.2\bin.


Logstash conf file consists of three parts shown below

input{

}
filter
{

}
output
{

}

Input: This tells logstash where the data is coming from. For example File, eventlog, twitter, tcp and so on. All the supported inputs can be found here.

Filter: This tells logstash what you want to do to the data before you output it into your log store (in our case elasticsearch). This accepts regular expressions. Most people use precreated regular expressions called grok, instead of writing their own regular expressions to parse log data. The complete list of filters you can use can be seen here.

Output: This tells logstash where to putput this filtered data to. We are going to output it into elasticsearch. You can have multiple outputs if you want.


This is how my logstash.conf looks like


input {

    file {    
       
 path => ["C:/Program Files/apache-tomcat-7.0.55/logs/*.log"]
    }

}

filter {

 
}

output{

   elasticsearch {
     cluster=>"VivekLocalMachine"
      port => "9200"
      protocol => "http"
    }
}


The cluster name should match what you set in C:\Program Files\elasticsearch-1.3.4\config\elasticsearch.yml

Many times when I made changes to my  logstash.conf , I have had to restart the machine that hosted logstash, for these changes to take effect. Restarting logstash didn't always help.


Start up logstash


In the command prompt cd into
C:\Program Files\logstash-1.4.2\bin

Then run this
logstash.bat agent -f logstash.conf


Now you should start seeing data in real time in your kibana website. For me that url is
http://localhost:8080/kibana-3.1.1/index.html

Adding a filter in logstash conf file


Lets take this example one step further by adding a filter in the C:\Program Files\logstash-1.4.2\bin\logstash.conf  file. 

We will be adding a "grok" filter. The purpose of adding this filter is to format the log text into a format that is easier to read. Log stash comes with many pre created regular expressions in 

C:\Program Files\logstash-1.4.2\patterns\

All these regular expressions are given names in these patterns files. We will be using those names in our grok filter.

Given below in the logstash.conf file with a filter applied. 

input {

    file {    
       
 path => ["C:/Program Files/apache-tomcat-7.0.55/logs/*.txt"]
  type => ["tomcatTxtLog"]
    }


}

filter {
      grok {
           match => ["message", "%{COMMONAPACHELOG:myCustomColumn}"]
           }
}


output{

   elasticsearch {
     cluster=>"VivekLocalMachine"
      port => "9200"
      protocol => "http"
    }
}


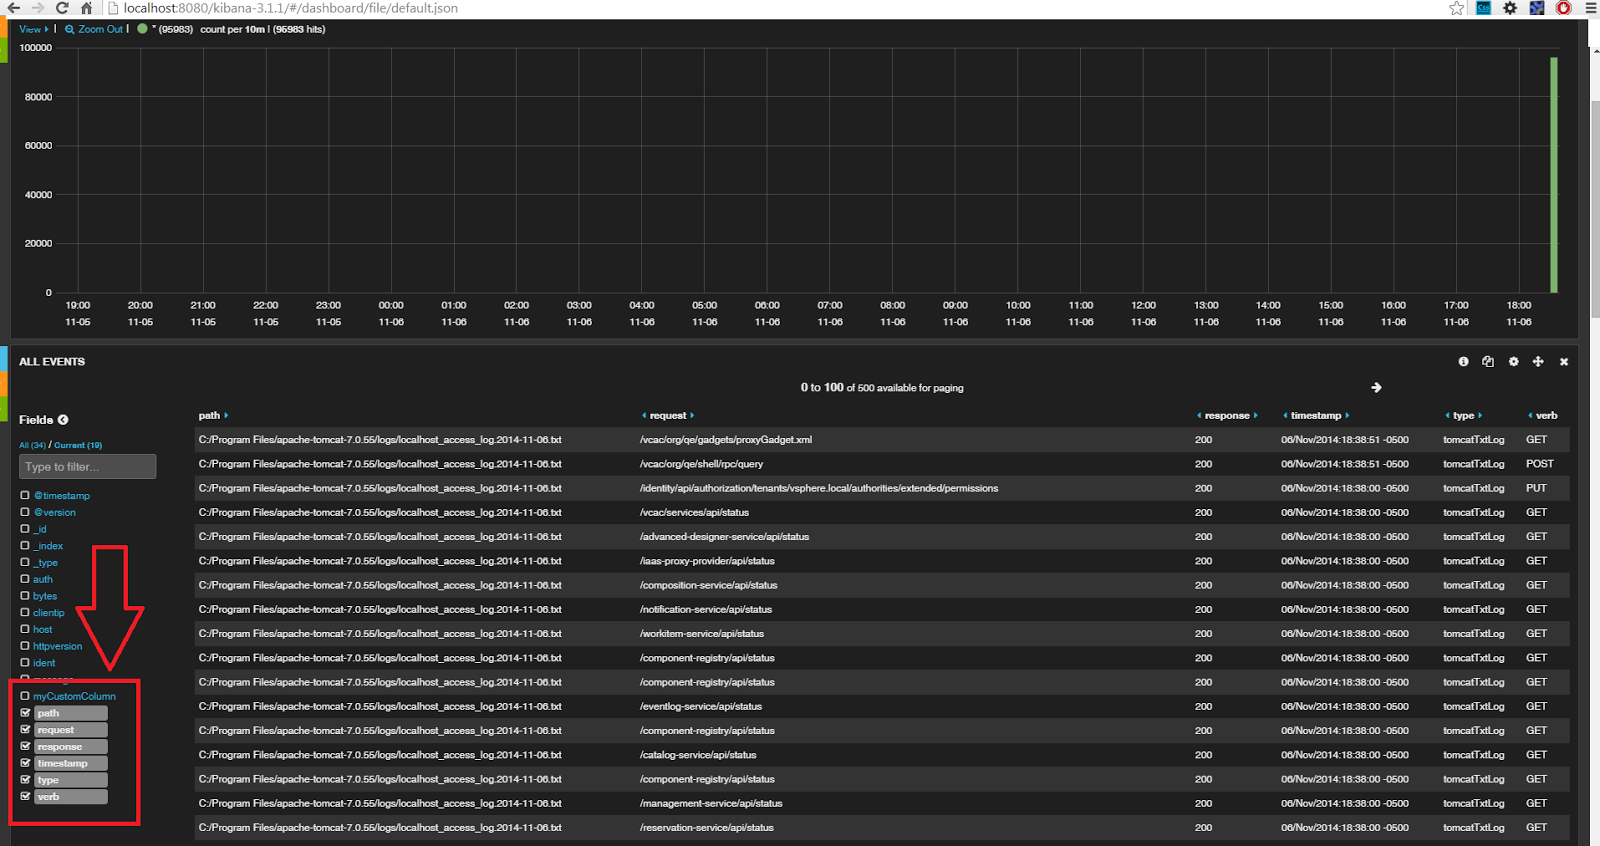
This is how the kibana output looks like with the filter applied.


Use this tool to play around with grok filters.

To test the example above  put these values into the grok Debugger

0:0:0:0:0:0:0:1 - - [30/Oct/2014:17:08:41 -0400] "GET / HTTP/1.1" 200 11418


%{COMMONAPACHELOG}


To check the indices created by logstash in elastic search go to this url
http://localhost:9200/_cat/indices?v

Check this for a more detailed explanation on logstash filters.
Check this for more on logstash configuration files.

Monday, October 13, 2014

Powershell replace files

The powershell script below replaces all occurrences of the file Hello.txt in the path C:\Users\menonv\Desktop with that from C:\test\Hello.txt


Clear-Host

$searchPath= "C:\Users\menonv\Desktop"
$fileToBeReplaced="Hello.txt"
$replacementFile="C:\test\Hello.txt"


set-location $searchPath


$ReplaceTheseFiles=get-childitem $fileToBeReplaced -rec

foreach ($file in $ReplaceTheseFiles)
{
Write-Host "Replacing File" $file with $replacementFile

Copy-Item $replacementFile $file
}

Monday, September 29, 2014

Git rollback latest changeset

In git to rollback the latest changeset, you do a git reset hard and specify the commit ID of the changeset before that.

For example suppose your latest commit id is fd1793a0a8366bdd48a85f7afe4fe26339f1149c. And the commit id of the previous commit is a6755301e8b283a0c7191028bb7611feff003cdd. To roll back fd1793a0a8366bdd48a85f7afe4fe26339f1149c this is what you do


git reset --hard a6755301e8b283a0c7191028bb7611feff003cdd


This points your Head to a6755301e8b283a0c7191028bb7611feff003cdd, effectively rolling back fd1793a0a8366bdd48a85f7afe4fe26339f1149c.

Monday, September 15, 2014

Debug tomcat web apps using intellij (IntelliJ attach to process)

1>Go to Run>Edit Configurations

Create a configuration under remote


In "Search sources using Module's classpath", select the project that you want to debug

(In your catalina.bat you will have something like this set JPDA_ADDRESS=localhost:8000)

2>Start tomcat server using the command (the switch jpda is what enables debugging)
catalina.bat jpda  start

You can also use the below command, if you want to make a copy of tomcat console into a file
catalina.bat   jpda   run > catalina.out 

3>Click the bug symbol on the upper right corner of intelliJ


4> If everything goes well, you should this in your console.


Sunday, September 14, 2014

Enabling SQL trace on PostgreSQL 9.3 (on 64 bit Windows 7)

Edit C:\Program Files\PostgreSQL\9.3\data\postgresql.conf  and update the following values

#log_statement = 'all'
#log_min_error_statement = error


Restart the service postgresql-x64-9.3


Now you can see all the SQL queries against postgreSQL DB in

C:\Users\<username>\AppData\Roaming\postgresql\pgadmin_histoqueries.xml


Tuesday, August 12, 2014

How to see localhost traffic in fiddler? (Show local IIS traffic in fiddler)

If one of your applications in your IIS is calling another application within your IIS, fiddler doesn't catch it by default. To show that traffic you need to perform two simple steps

1>In your config files, replace localhost/ with yourMachineName/
2>Run all IIS application pools under the same id that is running fiddler.(Note: If one of the apps inside IIS is calling another app in IIS. And the caller is running under an identity different from the identity that fiddler is running under, then that call will NOT be logged. )

What I usually do for testing is run all the application pools under my userid. 

Sunday, August 10, 2014

Windows 7 PowerShell Tutorial (Introduction to Windows 7 PowerShell)

What is Windows PowerShell?

Windows 7 powershell located at

      Start>All Programs>Accessories>Windows PowerShell>Windows PowerShell                   

 is command line tool which was built on top of .net framework. Windows powershell can be thought of as an advanced version of windows command prompt. (And PowerShell script is the advanced replacement for batch file) You can do a lot of things in powershell that you couldn't in the command prompt. In fact the industry push is towards using powershell for all windows computer administration tasks. Almost any windows administration task you can do thru a GUI, you can do it using powershell. The fact that command line tools barely change over time, makes it even more worth-while mastering them. The first version of powershell was released with Windows XP SP2 in 2006 as an optional add-on.

PowerShell Verbs and Nouns

All command-lets (commands) in powershell follow a verb-noun syntax. For example Get-Location, Set-Location, Get-Help, Clear-Host and so on. Once you understand this, you could guess many of the commands in PowerShell. PowerShell has a logical naming scheme for its commands.

Most common verbs used in powershell

Get
Set
Add
Out
Start
Restart
Stop

Most common nouns used in powershell

Help
Command
Computer
Service
ChildItems
Location

Frequently used PowerShell command-lets (commands)

Most commonly used commands in powershell

Powershell Command-Let example
What does it do?


Get-Content myFile.txt
Prints out the contents of myFile.txt onto the console window
Get-ChildItem
Lists all the items in the current directory (Same as dir in command prompt)
Get-ChildItem|
select-object Name, LastWriteTime |
sort-object LastWriteTime
Lists all the items in the current directory.
Only display their Name and LastWriteTime.
Order by LastWriteTime ascending
(The pipes are used to add conditions)
Copy-Item myFile.txt myFileCopy.txt
Creates a copy of myFile.txt and names that copy myFileCopy.txt
Invoke-item .
Open current directory
Clear-Host
Clear screen. (Same as cls from command prompt)
get-alias
Gives you short forms for various commands
set-alias list Get-ChildItem
Give Get-ChildItem an alias of list. In other words I am telling powershell, when I execute list what I mean is execute Get-ChildItem.
Note: Once you close the window the aliases you created are lost.
export-alias myAlias.csv
Export all aliases to a file called myAlias.csv
export-alias myAlias.csv
Import all the aliases in the file myAlias.csv
Get-Command
Gets all the available commands
Get-Command -verb "get"
Get all the commands with the verb “get” in it
For example Get-Host, Get-Process and so on
Get-Command -noun "job"

Get all the commands with the noun job in it.
For example Get-Job, Receive-Job and so on
Get-Command -type cmdlet
 Gets all the command-lets in powershell
Get-Help Get-Job -full
Gives you an explanation on what the command Get-Job does, explains to you its parameters and gives you some examples on how to use that command
Get-Location
Gets information about the current working location.
$test= "C:\Users\menonv\Desktop\myFile.txt"

(Get-Content $test).Replace("Hello","Hi")| Out-File  $test
In the file myFile.txt, replace Hello with Hi.
$env:Path
Gives you the value of the environment variable path
[Environment]::SetEnvironmentVariable( "NameOfTheVariable", "ValueOfTheVariable", [System.EnvironmentVariableTarget]::Machine )
Saves a system environment variable with the name NameOfTheVariable
and the
 value ValueOfTheVariable


Of all the command-lets above Get-Command And Get-Help are the most useful commands-lets. Thats why I have highlighted them.

PowerShell Providers

PowerShell providers are basically .net libraries for navigating some source (such as environment variables, registry, a remote computer and so on). To find all the providers run the command

get-psprovider    

You will see a result like this one (without the table :) )

Name           
Capabilities                 
Drives          
WSMan          
Credentials                  
{WSMan}         
Alias          
ShouldProcess                
{Alias}         
Environment    
ShouldProcess                
{Env}           
FileSystem     
Filter, ShouldProcess        
{C, D}          
Function       
ShouldProcess                
{Function}      
Registry       
ShouldProcess, Transactions  
{HKLM, HKCU}    
Variable       
ShouldProcess                
{Variable}      
Certificate    
ShouldProcess                
{cert}          

To navigate any of these sources you will have to "change your drive" to that provider. That's how the providers work in PowerShell. For example if I want to see all my environment variables this is what I would do

set-location Env:
get-ChildItem    


PowerShell Snapins

We get access to providers via powershell snapins. To see a list of currently loaded sanpins run the command-let

get-pssnapin   

You will see something like this

Name        : Microsoft.PowerShell.Diagnostics
PSVersion   : 2.0
Description : This Windows PowerShell snap-in contains Windows Eventing and Performance Counter cmdlets.

Name        : Microsoft.WSMan.Management
PSVersion   : 2.0
Description : This Windows PowerShell snap-in contains cmdlets (such as Get-WSManInstance and Set-WSManInstance) that are used by the Windows Pow
              erShell host to manage WSMan operations.

Name        : Microsoft.PowerShell.Core
PSVersion   : 2.0
Description : This Windows PowerShell snap-in contains cmdlets used to manage components of Windows PowerShell.

Name        : Microsoft.PowerShell.Utility
PSVersion   : 2.0
Description : This Windows PowerShell snap-in contains utility Cmdlets used to manipulate data.

Name        : Microsoft.PowerShell.Host
PSVersion   : 2.0
Description : This Windows PowerShell snap-in contains cmdlets (such as Start-Transcript and Stop-Transcript) that are provided for use with the
              Windows PowerShell console host.

Name        : Microsoft.PowerShell.Management
PSVersion   : 2.0
Description : This Windows PowerShell snap-in contains management cmdlets used to manage Windows components.

Name        : Microsoft.PowerShell.Security
PSVersion   : 2.0
Description : This Windows PowerShell snap-in contains cmdlets to manage Windows PowerShell security.


To see a list of snapins that are available but not loaded can be found by running

get-pssnapin -Registered   

You will see something like

Name        : SqlServerCmdletSnapin100
PSVersion   : 2.0
Description : This is a PowerShell snap-in that includes various SQL Server cmdlets.

Name        : SqlServerProviderSnapin100
PSVersion   : 2.0
Description : SQL Server Provider

Name        : WDeploySnapin3.0
PSVersion   : 2.0
Description : This is a PowerShell snap-in that contains cmdlets for managing Microsoft Web Deployment infrastructure.


As you can see there are two snapins that I could load to access my sql server database

This is how you load those snapins

add-pssnapin SqlServerCmdletSnapin100
add-pssnapin SqlServerProviderSnapin100

Now if you run the get-psprovider command, you will see that SQL Server is available on the drive "SQLSERVER"


Accessing SQL Server via powershell

Now that we load the SQL server snapin, we can access the local SQL server.

Clear-Host
set-location   SQLSERVER:\
get-childitem

Now you will see something like this

PSPath        : SqlServerProviderSnapin100\SqlServer::SQLSERVER:\SQL
PSParentPath  : SqlServerProviderSnapin100\SqlServer::SQLSERVER:
PSChildName   : SQL
PSDrive       : SQLSERVER
PSProvider    : SqlServerProviderSnapin100\SqlServer
PSIsContainer : True
Name          : SQL
Root          : SQLSERVER:\SQL
Description   : SQL Server Database Engine

PSPath        : SqlServerProviderSnapin100\SqlServer::SQLSERVER:\SQLPolicy
PSParentPath  : SqlServerProviderSnapin100\SqlServer::SQLSERVER:
PSChildName   : SQLPolicy
PSDrive       : SQLSERVER
PSProvider    : SqlServerProviderSnapin100\SqlServer
PSIsContainer : True
Name          : SQLPolicy
Root          : SQLSERVER:\SQLPolicy
Description   : SQL Server Policy Management

PSPath        : SqlServerProviderSnapin100\SqlServer::SQLSERVER:\SQLRegistration
PSParentPath  : SqlServerProviderSnapin100\SqlServer::SQLSERVER:
PSChildName   : SQLRegistration
PSDrive       : SQLSERVER
PSProvider    : SqlServerProviderSnapin100\SqlServer
PSIsContainer : True
Name          : SQLRegistration
Root          : SQLSERVER:\SQLRegistration
Description   : SQL Server Registrations

PSPath        : SqlServerProviderSnapin100\SqlServer::SQLSERVER:\DataCollection
PSParentPath  : SqlServerProviderSnapin100\SqlServer::SQLSERVER:
PSChildName   : DataCollection
PSDrive       : SQLSERVER
PSProvider    : SqlServerProviderSnapin100\SqlServer
PSIsContainer : True
Name          : DataCollection
Root          : SQLSERVER:\DataCollection
Description   : SQL Server Data Collection

PSPath        : SqlServerProviderSnapin100\SqlServer::SQLSERVER:\Utility
PSParentPath  : SqlServerProviderSnapin100\SqlServer::SQLSERVER:
PSChildName   : Utility
PSDrive       : SQLSERVER
PSProvider    : SqlServerProviderSnapin100\SqlServer
PSIsContainer : True
Name          : Utility
Root          : SQLSERVER:\Utility
Description   : SQL Server Utility

PSPath        : SqlServerProviderSnapin100\SqlServer::SQLSERVER:\DAC
PSParentPath  : SqlServerProviderSnapin100\SqlServer::SQLSERVER:
PSChildName   : DAC
PSDrive       : SQLSERVER
PSProvider    : SqlServerProviderSnapin100\SqlServer
PSIsContainer : True
Name          : DAC
Root          : SQLSERVER:\DAC
Description   : SQL Server Data-Tier Application Component

Take a note of the PSChildName where the description is SQL server Database engine

Clear-Host
set-location SQL
get-childitem

You will see something like this
PSPath : SqlServerProviderSnapin100\SqlServer::SQLSERVER:\SQL\VIVEK-PC
PSParentPath : SqlServerProviderSnapin100\SqlServer::SQLSERVER:\SQL
PSChildName : VIVEK-PC 
PSDrive : SQLSERVER
PSProvider : SqlServerProviderSnapin100\SqlServer
PSIsContainer : True
MachineName : VIVEK-PC
ManagedComputer : Microsoft.SqlServer.Management.Smo.Wmi.ManagedComputer
Servers : {[DEFAULT, Microsoft.SqlServer.Management.PowerShell.Extensions.ServerInformation]}

Take note of the PSChildName.

Clear-Host
set-location VIVEK-PC
get-childitem

PSPath : SqlServerProviderSnapin100\SqlServer::SQLSERVER:\SQL\VIVEK-PC\DEFAULT PSParentPath : SqlServerProviderSnapin100\SqlServer::SQLSERVER:\SQL\VIVEK-PC PSChildName : DEFAULT PSDrive : SQLSERVER PSProvider : SqlServerProviderSnapin100\SqlServer PSIsContainer : True DisplayName : DEFAULT AuditLevel : Failure BackupDirectory : C:\Program Files\Microsoft SQL Server\MSSQL10_50.MSSQLSERVER\MSSQL\Backup BrowserServiceAccount : NT AUTHORITY\LOCALSERVICE BrowserStartMode : Disabled BuildClrVersionString : v2.0.50727 BuildNumber : 1617 Collation : SQL_Latin1_General_CP1_CI_AS CollationID : 872468488 ComparisonStyle : 196609 ComputerNamePhysicalNetBIOS : VIVEK-PC DefaultFile : DefaultLog : Edition : Developer Edition (64-bit) ErrorLogPath : C:\Program Files\Microsoft SQL Server\MSSQL10_50.MSSQLSERVER\MSSQL\Log FilestreamLevel : Disabled FilestreamShareName : MSSQLSERVER InstallDataDirectory : C:\Program Files\Microsoft SQL Server\MSSQL10_50.MSSQLSERVER\MSSQL InstallSharedDirectory : c:\Program Files\Microsoft SQL Server\MSSQL10_50.MSSQLSERVER\MSSQL InstanceName : IsCaseSensitive : False IsClustered : False IsFullTextInstalled : True IsSingleUser : False Language : English (United States) LoginMode : Mixed MailProfile : MasterDBLogPath : C:\Program Files\Microsoft SQL Server\MSSQL10_50.MSSQLSERVER\MSSQL\DATA MasterDBPath : C:\Program Files\Microsoft SQL Server\MSSQL10_50.MSSQLSERVER\MSSQL\DATA MaxPrecision : 38 NamedPipesEnabled : False NetName : VIVEK-PC NumberOfLogFiles : -1 OSVersion : 6.1 (7601) PerfMonMode : None PhysicalMemory : 16298 PhysicalMemoryUsageInKB : 186024 Platform : NT x64 Processors : 4 ProcessorUsage : 0 Product : Microsoft SQL Server ProductLevel : RTM ResourceLastUpdateDateTime : 4/22/2011 2:40:54 PM ResourceVersionString : 10.50.1617 RootDirectory : c:\Program Files\Microsoft SQL Server\MSSQL10_50.MSSQLSERVER\MSSQL ServerType : Standalone ServiceAccount : NT AUTHORITY\NETWORKSERVICE ServiceInstanceId : MSSQL10_50.MSSQLSERVER ServiceName : MSSQLSERVER ServiceStartMode : Auto SqlCharSet : 1 SqlCharSetName : iso_1 SqlDomainGroup : Vivek-PC\SQLServerMSSQLUser$Vivek-PC$MSSQLSERVER SqlSortOrder : 52 SqlSortOrderName : nocase_iso Status : Offline TapeLoadWaitTime : -1 TcpEnabled : False VersionMajor : 10 VersionMinor : 50 VersionString : 10.50.1617.0 Name : VIVEK-PC Version : 10.50.1617 EngineEdition : EnterpriseOrDeveloper ResourceVersion : 10.50.1617 BuildClrVersion : 2.0.50727 DefaultTextMode : True Configuration : Microsoft.SqlServer.Management.Smo.Configuration AffinityInfo : Microsoft.SqlServer.Management.Smo.AffinityInfo ProxyAccount : [VIVEK-PC] Mail : [VIVEK-PC] Databases : {master, model, msdb, Play...} Endpoints : {Dedicated Admin Connection, TSQL Default TCP, TSQL Default VIA, TSQL Local Machine...} Languages : {Arabic, British, čeština, Dansk...} SystemMessages : {21, 21, 21, 21...} UserDefinedMessages : {} Credentials : {} CryptographicProviders : {} Logins : {##MS_PolicyEventProcessingLogin##, ##MS_PolicyTsqlExecutionLogin##, NT AUTHORITY\NETWORK SERVICE, NT AU THORITY\SYSTEM...} Roles : {bulkadmin, dbcreator, diskadmin, processadmin...} LinkedServers : {} SystemDataTypes : {bigint, binary, bit, char...} JobServer : [VIVEK-PC] ResourceGovernor : Microsoft.SqlServer.Management.Smo.ResourceGovernor ServiceMasterKey : Microsoft.SqlServer.Management.Smo.ServiceMasterKey Settings : Microsoft.SqlServer.Management.Smo.Settings Information : Microsoft.SqlServer.Management.Smo.Information UserOptions : Microsoft.SqlServer.Management.Smo.UserOptions BackupDevices : {} FullTextService : [VIVEK-PC] ActiveDirectory : Microsoft.SqlServer.Management.Smo.ServerActiveDirectory Triggers : {} Audits : {} ServerAuditSpecifications : {} ConnectionContext : server='VIVEK-PC';Trusted_Connection=true;Connect Timeout=30;Application Name='SQLPS (Vivek@VIVEK-PC)';m ultipleactiveresultsets=false Events : Microsoft.SqlServer.Management.Smo.ServerEvents OleDbProviderSettings : Urn : Server[@Name='VIVEK-PC'] Properties : {Name=AuditLevel/Type=Microsoft.SqlServer.Management.Smo.AuditLevel/Writable=True/Value=Failure, Name=Ba ckupDirectory/Type=System.String/Writable=True/Value=C:\Program Files\Microsoft SQL Server\MSSQL10_50.MS SQLSERVER\MSSQL\Backup, Name=BuildNumber/Type=System.Int32/Writable=False/Value=1617, Name=DefaultFile/T ype=System.String/Writable=True/Value=...} UserData : State : Existing

Note the PSChildName.

Clear-Host
set-location DEFAULT
get-childitem


Audits
BackupDevices
Credentials
CryptographicProviders
Databases
Endpoints
JobServer
Languages
LinkedServers
Logins
Mail
ResourceGovernor
Roles
ServerAuditSpecifications
SystemDataTypes
SystemMessages
Triggers
UserDefinedMessages

Running the command below will show you all the databases on your SQL server

Clear-Host
set-location Databases
get-childitem | Select-Object PSChildName

Friday, July 25, 2014

Microsoft shims for faking methods

If you want to inject some fake code for testing, there are two ways to do it. Stubs and Shims.


Stubs can be achieved using dependency injection. Microsoft provides the unity framework to facilitate dependency injection. I personally prefer autofac for dependency injection.

If your code was not written keeping testability in mind, then you may not be able to use stubs. That's where shims come in. A shim modifies the compiled code of your application at run time so that instead of making a specified method call, it runs the shim code that your test provides. Shims are also useful when you want to fake something in a third party assembly.

Note: Fakes are available only in VS Ultimate.

In the example below, I will be testing a method that returns current year +1.

 class MyClassToBeTested
    {
        public static int ReturnCurrentYearPlusOne()
        {
            return System.DateTime.Now.Year+1;
        }
    }

As you can see, if I want System.DateTime.Now to return 1/1/2000, its not possible. Unless I fake it.

This is how you do it

1>Add references to 
  • c:\Program Files (x86)\Microsoft Visual Studio 11.0\Common7\IDE\PublicAssemblies\Microsoft.QualityTools.Testing.Fakes.dll
  • c:\Program Files (x86)\Microsoft Visual Studio 11.0\Common7\IDE\PublicAssemblies\Microsoft.VisualStudio.QualityTools.UnitTestFramework.dll
2>Right click on the reference System and click "Add Fakes Assembly"


3>Paste the code below into a class file

using System;
using System.Fakes;
using Microsoft.QualityTools.Testing.Fakes;
using Microsoft.VisualStudio.TestTools.UnitTesting;
 
namespace ShimPlay
{
    [TestClass]
    public class ShimPlayClass
    {
        [TestMethod]
        public void TestMethod()
        {
            int nextYear = MyClassToBeTested.ReturnCurrentYearPlusOne(); //returns 2015 (current year is 2014)
 
            using (ShimsContext.Create())
            {
               //The faking happens only inside this using block
               ShimDateTime.NowGet = () => new DateTime(2000, 1, 1);
               int nextYearFake = MyClassToBeTested.ReturnCurrentYearPlusOne();//returns 2001
            }
        }
    }
 
    internal class MyClassToBeTested
    {
        public static int ReturnCurrentYearPlusOne()
        {
            return DateTime.Now.Year + 1;
        }
    }
}