Translate

Thursday, August 13, 2015

Java DeepCopy using JAXB


import javax.xml.bind.JAXBElement;
import javax.xml.namespace.QName;
import java.io.Serializable;

/** * Returns a deep copy of any object that implements Serializable. * This class uses JAXB to serialize and deserialize objects */public class Copier<T extends Serializable> {

    private final Class<T> type;

    public Copier(Class<T> type) {
        this.type = type;
    }

    public T GetCopy(T objectToBeCopied) {

        JAXBElement<T> serializedObject = new JAXBElement(new QName("T"), type, objectToBeCopied);

        T deserialized = serializedObject.getValue();

        return (T) (deserialized);

    }


}


Example that uses the code4 above

Copier<Person> copier =new Copier(Person.class);
Person deepCopyPerson= copier.GetCopy(myPerson); 

Friday, July 24, 2015

Java collections tutorial

The two most popular collections used in Java are List and Map. Both are generic interfaces. Java framework library provides many implementations of both these interfaces.

   The most popular implementation of List is the ArrayList class. ( If you are from the C# world, note that Arraylist in java has nothing to do with Arraylist in C#. ArrayList in java is strongly typed and more similar to List<T> in C#.).

The most popular implementation of Map in Java is the HashMap.


An example of List in java

 
import java.util.ArrayList;
import java.util.List;

public class Main {

    public static void main(String[] args) {

        List<Student> students = new ArrayList<Student>();

        Student student1 = new Student() {{
            setName("Jack");
            setCollege("MIT");
            setMajor("Computer Science");
            setSsn("123-45-5678");
        }};

        Student student2 = new Student() {{
            setName("Sandra");
            setCollege("Harvard");
            setMajor("Medicine");
            setSsn("999-45-5678");
        }};

        students.add(student1);
        students.add(student2); 

        for (Student s : students) {
            System.out.println(s.getName());
        }

    }
}

 
public class Student {

    private String name;
    private String college;
    private String major;
    private String ssn;

    public String getName() {
        return name;
    }

    public void setName(String name) {
        this.name = name;
    }

    public String getMajor() {
        return major;
    }

    public void setMajor(String major) {
        this.major = major;
    }

    public String getCollege() {
        return college;
    }

    public void setCollege(String college) {
        this.college = college;
    }

    public String getSsn() {
        return ssn;
    }

    public void setSsn(String ssn) {
        this.ssn = ssn;
    }
}


Note here that Lists are allowed to have duplicates. In the above example you can enter the same student object multiple times into the List.


An example of Map in java

You use a Map when you want to look up values by a key. For example you could store people's information in a Map and look them up by their Social Security number (key).  

 
import java.util.HashMap;
import java.util.Map;

public class Main {

    public static void main(String[] args) {

        Map<String, Student> students = new HashMap<String, Student>();

        Student student1 = new Student() {{
            setName("Jack");
            setCollege("MIT");
            setMajor("Computer Science");
            setSsn("123-45-5678");
        }};

        Student student2 = new Student() {{
            setName("Sandra");
            setCollege("Harvard");
            setMajor("Medicine");
            setSsn("999-45-5678");
        }};

        students.put(student1.getSsn(), student1);
        students.put(student2.getSsn(), student2);


        System.out.println(students.get("999-45-5678").getName());//Sandra
    }
}


Monday, July 20, 2015

Builder pattern tutorial Java (Beginners introduction to builder pattern)

The requirement

Suppose you need a Sandwich class which has 3 ingredients bread, cheese and meat. The requirement is you can pick any combination of these items. And once the Sandwich class is initialized, you shouldn't be able to change these ingredients. One easy way to achieve this is


public class Sandwich {

    private String bread;//immutable
    private String cheese;//immutable
    private String meat;//immutable

    public Sandwich(String bread, String cheese, String meat) {
        this.bread = bread;
        this.cheese = cheese;
        this.meat = meat;
    }

    public String getBread() {
        return bread;
    }

    public String getCheese() {
        return cheese;
    }


    public String getMeat() {
        return meat;
    }

}


public class Main {
   
public static void main(String[] args) {
        Sandwich mySandwich =
new Sandwich("ItalianBread", "Swiss", "");
    }
}

The above code doesn't let you change the ingredients once you initialize it, which meets our requirement at the same time you have to specify all the ingredients even if you don't need it. (We didn't want meat in our sandwich so we just passed an empty string for meat).


A more graceful code that uses builder pattern

A more graceful way of handling the above requirement is by using a builder pattern. In this pattern, we use a nested static class. 

public class Sandwich {
   
private String bread;// immutable
   
private String cheese;///immutable
   
private String meat;///immutable

   
public Sandwich(Builder builder) {
       
this.bread = builder.bread;
       
this.cheese = builder.cheese;
       
this.meat = builder.meat;
    }

   
public static class Builder {

       
private String bread;
       
private String cheese;
       
private String meat;

       
public Builder() {
        }

       
public Builder bread(String bread) {
           
this.bread = bread;
           
return this;//We are returning a reference to itself so that we can call other methods on it like cheese() meat() and so on
       
}

       
public Builder cheese(String cheese) {
           
this.cheese = cheese;
           
return this;
        }

       
public Builder meat(String bread) {
           
this.meat = meat;
           
return this;
        }

       
public Sandwich build() {
           
return new Sandwich(this
);
        }

    }


public String getBread() {
        
return bread;
    }

   
public String getCheese() {
       
return cheese;
    }

   
public String getMeat() {
       
return meat;
    }

}

public class Main {
    public static void main(String[] args) {
        Sandwich.Builder sandwichBuilder=new Sandwich.Builder();
        sandwichBuilder.bread("ItalianBread").cheese("swiss");
        Sandwich mySandwich=sandwichBuilder.build();
    }
}


Friday, July 10, 2015

Java InputStreamReader simple example

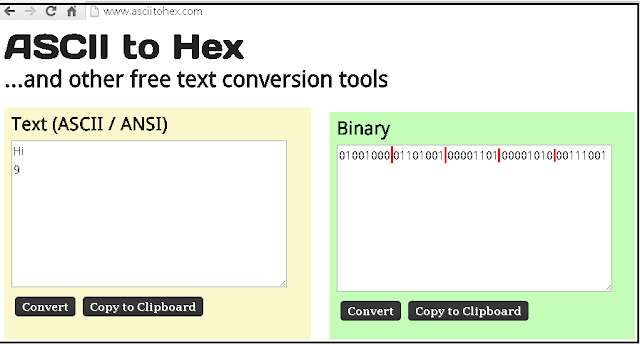
To  follow along go to a ascii to binary converter and get a binary array for your text.

The text I am using is
Hi
9

This text when converted to binary looks like this


In the java program below these are things I will do

Create a byte array for my data
Create an InputStream object with the byte array
Use an InputStreamReader to interpret that InputStream data as ASCII data
Read the data in InputStreamReader with a BufferedReader


import java.io.*; 

public class Play {

    public static void main(String[] args) throws IOException {


        byte[] arrayOfBytes = new byte[]
                {
                        (byte) 0b01001000,

                        (byte) 0b01101001,

                        (byte) 0b00001101,

                        (byte) 0b00001010,

                        (byte) 0b00111001
                };

        InputStream is = new ByteArrayInputStream(arrayOfBytes);

        InputStreamReader isr = new InputStreamReader(is, "ASCII");

        BufferedReader br = new BufferedReader(isr);

        String line;

        while ((line = br.readLine()) != null) {
            System.out.println(line);
        }

    }
}


Dont forget to put 0b as a prefix when inputting binary data into the byte array. 


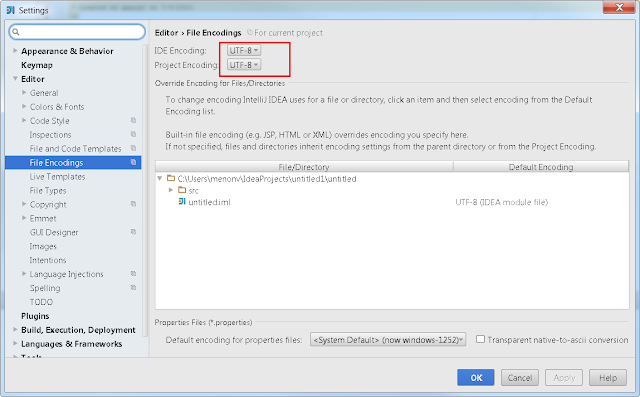
You can also print out non ascii characters. You just need to change the setting of your IDE to allow that. In intelliJ this is done by changing File Encoding under your project settings


Here is an example that prints out æ‚¨å¥½ (Hello in Chinese)


Friday, June 5, 2015

Monitoring localhost to localhost Restful calls in Windows 7 (Monitor Windows 7 localhost traffic in wireshark)

Easy way: Force all localhost traffic thru your network card.

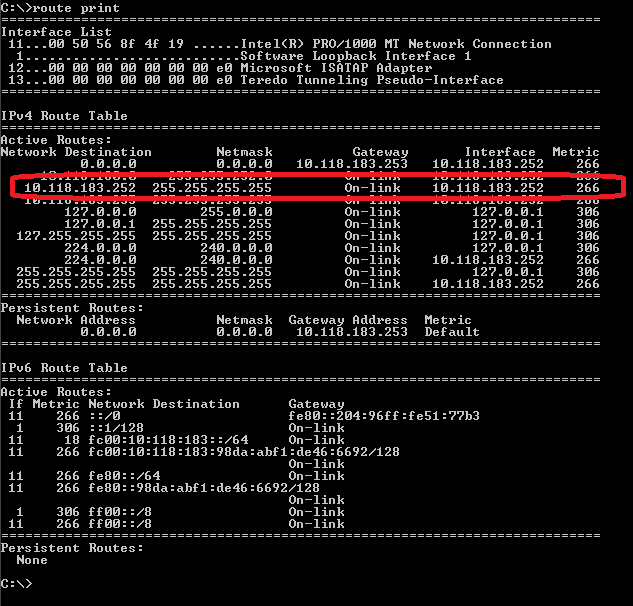
If you run route print you would see something like this


Here 10.118.183.252 is my local ipv4 address. As you can see any request to that ipaddress is short circuited by the operating system. It doesn't go thru my network card. To see the local host traffic in wireshark you need to perform these two steps

1>Modify routes to send all traffic for local ip address thru your default gateway (in this case 10.118.183.253)

route delete 10.118.183.252
route ADD 10.118.183.252  MASK 255.255.255.255 10.118.183.253

(This change is temporary. These changes will be lost when you restart your machine. to make these chages persistent use route -p instead of route)

2>Instead of localhost use your local ipaddress in all urls.


There you are all set!


An Alternative way


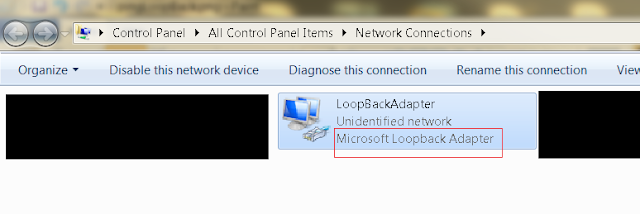
1>  Install microsoft loopback adapter.


2>Make sure you can ping loop back adapter by its static ip address. Otherwise further steps would fail.


After successfully completing this step, restart the machine.

2>Install Wireshark. (with winpcap, when prompted)
 If wireshark is already installed, reinstall after restart. Otherwise Wireshark won't see this new network interface.

3>Install rawcap

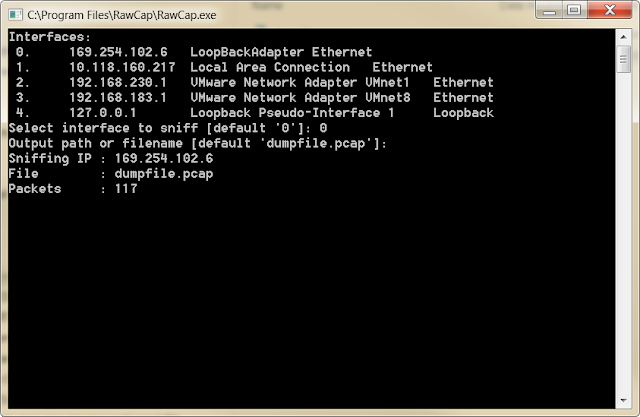
4>Start rawcap by double clicking it. Select the  Loop back adapter when prompted.


5>After you have captured all the traffic you need, stop rawcap by pressing ctrl+c.

6>Now doubleclick and open dumpfile.pcap.

I tested this for tomcat and IIS. 

Monday, June 1, 2015

Extjs dropdownlist

You could extend Ext.form.ComboBox to create a dropdownlist. In the example below all I have set is editable:false. That is enough to make it a dropdownlist.


The dropdownlist control


Ext.define('DropDownList', {
    extend: 'Ext.form.ComboBox',
    editable: false,

    alias: 'widget.dropdownlist',
    initComponent: function() {
        this.callParent([arguments]);
    },
    onRender: function() {
        this.callParent();

    }
});


The app.js that uses this control


var states = Ext.create('Ext.data.Store', {
    fields: ['abbr', 'name'],
    data: [{
        "abbr": "AL",
        "name": "Alabama"    }, {
        "abbr": "AK",
        "name": "Alaska"    }, {
        "abbr": "AZ",
        "name": "Arizona"    }]
});


Ext.application({

    name: 'MyApp',
    launch: function () {


        Ext.create('Ext.form.Panel', {

            items: [
                {
                    xtype: 'dropdownlist',
                    hideLabel: false,
                    title: 'ComboBox Test',
                    fieldLabel: 'Choose State',
                    store: states,
                    displayField: 'name',
                    valueField: 'abbr',
                    renderTo: Ext.getBody()
                }
            ]

        });
    }
});

Extjs Hello World application (Begginers introduction to extjs)

Show Hello World Alert

<!DOCTYPE html>
<html>
<head lang="en">
    <meta charset="UTF-8">
    <title></title>
</head>
<body>
<script src="https://cdnjs.cloudflare.com/ajax/libs/extjs/4.2.1/ext-all.js"></script>
<script type="text/javascript">

    Ext.application({
        name: 'MyApp',

        launch: function () {
            alert("Hello World");

        }
    });
</script>

</body>
</html>


Show Hello World HTML


<!DOCTYPE html>
<html>
<head lang="en">
    <meta charset="UTF-8">
    <title></title>
</head>
<body>
<script src="https://cdnjs.cloudflare.com/ajax/libs/extjs/4.2.1/ext-all.js"></script>
<script type="text/javascript">
var myComponent=Ext.create('Ext.Component',{
    html: 'HelloWorld'});

Ext.application({
    name: 'MyApp',

    launch: function () {
        Ext.create('Ext.container.Viewport', {
            items: [
                    myComponent            ]
        });
    }
});
</script> </body> </html>
The above code can also be written in a short hand way using xtype (preferred way)

<!DOCTYPE html>
<html>
<head lang="en">
    <meta charset="UTF-8">
    <title></title>
</head>
<body>
<script src="https://cdnjs.cloudflare.com/ajax/libs/extjs/4.2.1/ext-all.js"></script>
<script type="text/javascript">
Ext.application({
    name: 'MyApp',
    launch: function () {
        Ext.create('Ext.container.Viewport', {
            items: [
                {
                    xtype: 'component',
                    html: 'HelloWorld'                }
            ]
        });
    }
});
</script> </body> </html>

Tuesday, May 26, 2015

Extjs class example.

A car object in pure javascript

var myCar = new Object();
myCar.company = "Ford";
myCar.model = "Mustang";
myCar.year = 2007

alert(myCar.company);//displays Ford

A car class in ExtJS


Ext.application({
    name: 'Fiddle',

    launch: function() {

        Ext.define("Car",
                            {
                                company: "Ford",
                                 model: "Mustang",
                                  year: 2007
                             }
                         );

        var myCar = Ext.create("Car");
        alert(myCar.company);

    }


});


The general syntax for defining classes in Extjs is

Ext.define(className, members, onClassCreated);

className: The class name
members is an object that represents a collection of class members in key-value pairs
onClassCreated is an optional function callback that is invoked when all dependencies of the defined class are ready and the class itself is fully created. Due to the asynchronous nature of class creation, this callback can be useful in many situations.

The config member

Extjs classes have a special property called config. If you put properties inside this property, then you can call set and get on them. You also can define an apply on these properties that run as soon as a set is called on them. The set get and apply names are by convention (see example below)

Ext.application({
    name: 'Fiddle',

    launch: function() {


        Ext.define("Car", {
            company: "Ford",
            model: "Mustang",
            config: {
                year: 2007
            },

            applyYear: function(year) {
                alert("applying year");
                return year;
            }

        });

        var myCar = Ext.create("Car");

        myCar.setYear(2010);
        alert(myCar.getYear()); //Displays 2010

        myCar.setCompany("Toyota"); //fails because not inside config
        myCar.getCompany(); //fails because not inside config
    }


});

Extjs TaskRunner Example (Extjs delay)

function ConsoleWrite() {
console.log(Ext.Date.format(new Date(), 'g:i:s A'))
}

var runner = new Ext.util.TaskRunner();

runner.start({
runConsoleWrite,
interval: 1000});


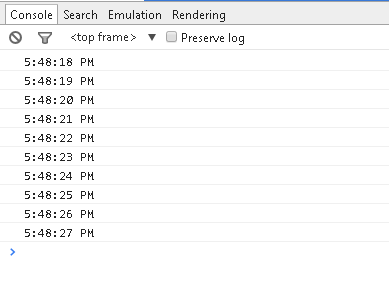
You will see something like this in the chrome F12 tools console


Monday, May 18, 2015

Command Pattern Tutorial C# (Also known as Action or Transaction Pattern)

What is the problem we are trying to solve?

Look at the example blow

using System;
 
namespace CommandPatternTutorial
{
    internal class Program
    {
        private static void Main(string[] args)
        {
            var commandExecutor = new CommandExecutor();
            commandExecutor.ProcessOrders("Update");
        }
    }
 
    public class CommandExecutor
    {
        public void ProcessOrders(String commandName)
        {
            switch (commandName)
            {
                case "Insert":
                    Insert();
                    break;
                case "Update":
                    Update();
                    break;
                case "Delete":
                    Delete();
                    break;
 
                default:
                    Console.WriteLine("Command not found");
                    break;
            }
        }
 
        public void Insert()
        {
            Console.WriteLine("Insert Order");
        }
 
        public void Update()
        {
            Console.WriteLine("Update Order");
        }
 
 
        public void Delete()
        {
            Console.WriteLine("Delete Order");
        }
    }
}

If you need to add a new command in there, you would have to modify the CommandExecutor class. This violates the Solid Open-Closed  and the single responsibility design principles.  To avoid these violations we will apply the Command and factory patterns.


Command Pattern


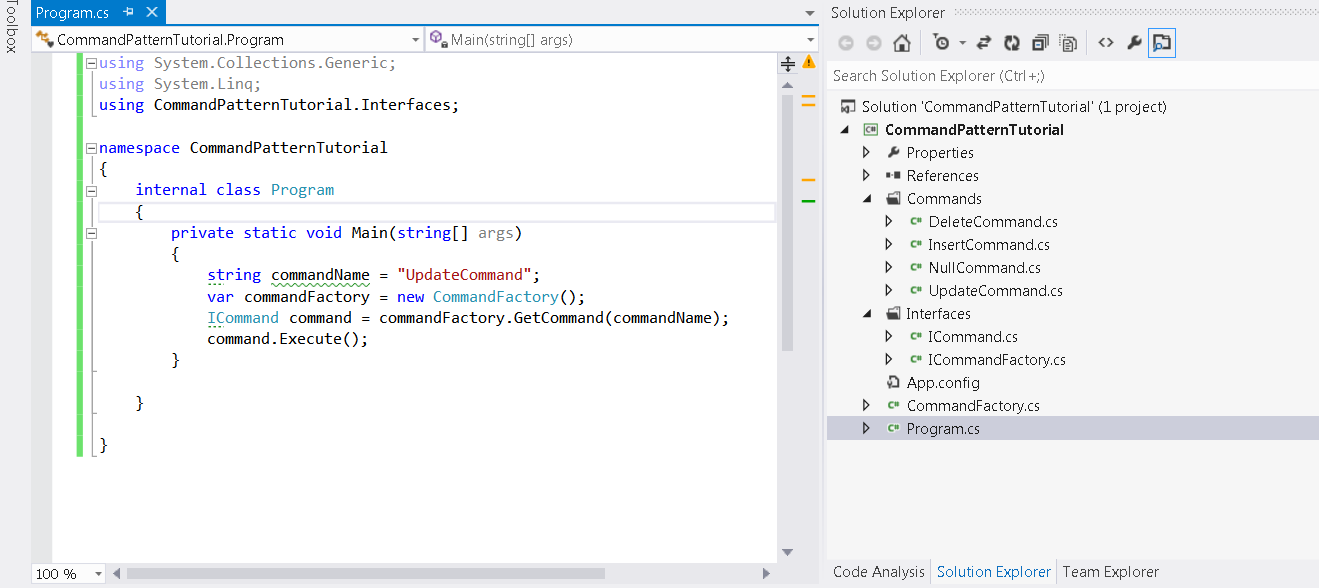
The complete code is given below. The crux of the command pattern is the ICommand interface which has just the Execute method. So command pattern in itself is very simple, simultaneous application of factory pattern is what makes it a bit more harder to understand.

Program.cs


using CommandPatternTutorial.Interfaces;

namespace CommandPatternTutorial
{
    internal class Program
    {
        private static void Main(string[] args)
        {
            string commandName = "UpdateCommand";
            var commandFactory = new CommandFactory();
            ICommand command = commandFactory.GetCommand(commandName);
            command.Execute();
        }
    }

}

ICommand.cs


namespace CommandPatternTutorial.Interfaces
{
    public interface ICommand
    {
        void Execute();
    }
}

ICommandFactory.cs


using CommandPatternTutorial.Interfaces;

namespace CommandPatternTutorial
{
    public interface ICommandFactory
    {
        ICommand GetCommand(string commandName);
    }
}


CommandFactory.cs


using System;
using System.Collections.Generic;
using System.Reflection;
using CommandPatternTutorial.Commands;
using CommandPatternTutorial.Interfaces;

namespace CommandPatternTutorial
{
    internal class CommandFactory : ICommandFactory
    {
        private Dictionary<string, Type> _commandsDictionary;

        public CommandFactory()
        {
            LoadCommands();
        }

        public ICommand GetCommand(string commandName)
        {
            commandName = commandName.ToLower();
            ICommand command;
            if (_commandsDictionary.ContainsKey(commandName))
            {
                Type type = _commandsDictionary[commandName];

                if (type != null)
                {
                    command = (ICommand) Activator.CreateInstance(type);
                }
                else
                {
                    command = new NullCommand();
                }
            }
            else
            {
                command = new NullCommand();
            }


            return command;
        }

        private void LoadCommands()
        {
            _commandsDictionary = new Dictionary<string, Type>();

            //Get the interfaces and classes in the current assembly
            Type[] typesinCurrentAssembly = Assembly.GetExecutingAssembly().GetTypes();
            string interfaceName = typeof (ICommand).ToString(); //"ICommand"

            foreach (Type type in typesinCurrentAssembly)
            {
                //Find the types that implement ICommand and add it to the dictionary _commandsDictionary
                if (type.GetInterface(interfaceName) != null)
                {
                    string typeName = type.Name.ToLower();
                    _commandsDictionary.Add(typeName, type);
                }
            }
        }
    }

}


UpdateCommand.cs

using System;
using CommandPatternTutorial.Interfaces;

namespace CommandPatternTutorial.Commands
{
    internal class UpdateCommand : ICommand
    {
        public void Execute()
        {
            Console.WriteLine("Update Order");
        }
    }

}

NullCommand.cs

using System;
using CommandPatternTutorial.Interfaces;

namespace CommandPatternTutorial.Commands
{
    internal class NullCommand : ICommand
    {
        public void Execute()
        {
            Console.WriteLine("Command Not Found");
        }
    }

}


Now if you need to add a new command, all you need to do is write a class that implements ICommand interface.